The Battle of Slingersfontein
10/05/16 02:29:pm
Prior to the replacement of Gen. Buller as Commander-inChief of British Forces in South Africa by Lord Roberts, the British Army had suffered a series of drastic reverses during its advance through the Cape and Natal, viz. Stormberg, Magersfont in & Colenso. More were to follow in 1900. Following the disaster at Magersfontein, Buller ordered Lord Methuen to fall back to the Orange River to await the arrival of Gen. Warren who, in effect, would be responsible for relieving Kimberley, but this plan was subsequently changed. Whilst the Boers laid siege to Kuruman, the British gradually began to recover from their misfortunes and after a series of well-planed maneuvers, finally relieved Kimberly on 16th February 1900.
The actions around Colesberg were important factors in the plan for the relief of Kimberley. On 1st November 1899, the Free Staters seized the railway bridge at Norvals Pont and the Cape Colony was invaded by the Smithfield & Bethulie Commanddos under Commandants Swanepoel & DuPlooy respectively, thus posing a threat to the British and resulting in the withdrawal of Imperial troops from Naaupoort & Stormberg to De Aar in the case of the former & Queenstown the latter. However, the Boers took no advantage of the opportunities offered by this withdrawal but contented themselves by slowly advancing in the direction of Colesberg, destroying the railway bridges in the process.
On 14th November, the Boers under Generals H. Schoeman & E.R.Grobler totalling some 700 men, entered Colesberg to the enthusiastic reception of the majority of the inhabitants. Once again they contented themselves with occupation of the town and only advanced as far as Arundel; surprisingly, they once again ignored the strategically important Naaupoort junction, and accordingly, Gen. French arrived there on the 20th November and whilst awaiting the arrival of reinforcement, French wasted no time in sending out patrols in every direction in order to try to contain the fast-spreading rebellion by so-called "disloyalists" which had began with the arrival of Burgers in the area bordering the O.F.S .. These patrols heralded the start of 3 months of intense activity which included the Battle of Slingersfontein. It was during this period of intense activity that the Boers, fearing that they would be surrounded by what appeared to be a concerted reinforcement movement on the part of the British, decided to evacuate their strongly-held position at Rensberg and accordingly fell back on Gen. French, already intending to attack the Boers at Rensberg, arrived at this place on the 30th December -3 days after the Boer withdrawal -but discovered that they had arrived too late to harass them.
Between the 1st and 6th January 1900, a number of attacks were made on the Boer positions around Colesberg, with some being partially successful but the whole affair ending in the disaster of the attack on Suffolk Hill on the outskirts of the town. As a result of this action, the British lost 11 Officers & 150 men (5 Officers 7 32 Men died and 4 Officers & 48 Men were wounded. 2 Officers & 70 Men were taken prisoner). It was also during these operations that a fully laden supply train ran down the incline out of Rensburg station and straight into the eager hands of the Boers! The Boer losses at the following day the dead were buried and it was on the occasion the bitterness of war was forgotten, for the Times History reports as follows: "The victors treated their wounded prisoners well, and were most sympathetic and courteous to the British burial party which went out on the following morning. They readily gave their help, and a pathetic scene took place at the open graveside. A grey-headed burgher asked leave to make an address. In a rough, simple way, he deprecated war and the sacrifice of human life, and prayed for the time when all men should live at peace with one another. Then the assembled burghers sang a psalm". By this stage, the Boers were even more strongly reinforced, their number totalling some 6000. Gen. French decided to test their strength to the east of their Colesberg positions and accordingly sent out a reconnaissance on the 7th Jan. almost as far as the Colesberg Junction/Norvals Pont railway line.
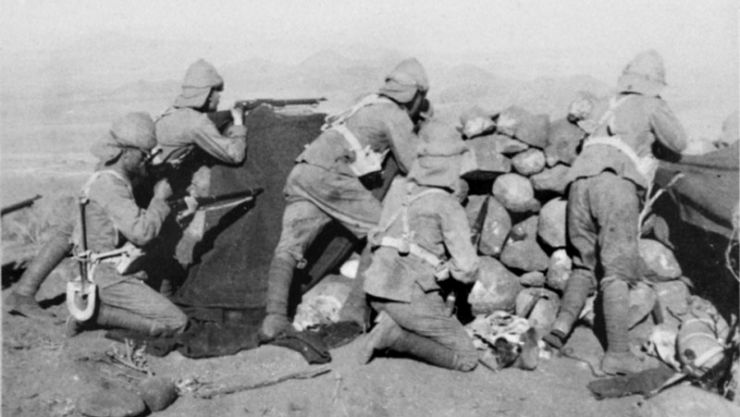
This resulted in his decision to use On the 9th Jan., French ordered a bombardment of the Boers center & right positions while Col. T.C.Porter took the Carabiniers, New South Wales Lancers, New Zealanders, 4 guns of "0" Bty, 2 Coys. of the Yorkshires and a mounted section of the Royal Engineers, and occupied the Farm & surrounding hills. The Boers, under Generals Schoeman & de la Rey, the latter having recently arrived from Magersfontein where he had been instrumental in the strategy of entrenching his forces, which had resulted in the crushing defeat of the British, had occupied a low range of hills to the north of Slingersfontein and were effectively in command of the railway line to Norvals Pont. At one stage, the Household Cavalry managed to secure a good position on the Boers westwards, but the arrival of reinforcements from Norvals Pont forced them to retire. Gen. de la Reys Headquarters were at Keerom Farm, south of Achtertang. He took over command of the entire Boer left position with a force of some 1000 men, mainly from the Johannesburg Commando and the ZARPS under Cmdt. Van Dam and it was not long before this superb tactician began to make his prp.senceknown and felt. On 13th Jan. he shelled Slingersfontein camp at long range, following this up on the 15th with a determined attack on a high, steep hill north of the Farm, to be known from that day as NEW ZEALAND HILL. The northern extremity of the hill was held by a weak half company of the 1st Yorkshire Regiment under Capt. Orr, posted inn two parallel sangars at the top of the slope. On the eastern side of the ridges were some 60 New Zealanders (New Zealand mounted Rifles) under Capt. W.N.Madocks. At daybreak on the 15th Jan., some 300 Boers concealed themselves in the koppies to the north & east and began pouring a steady rifle fire on the British sangars. This action began at 06h30, the rate of fire increasing in intensity until about 10hOO by which time the British hardly dared look over their sangars to fire.
Capt. Madocks had earlier sent out a strong flanking detachment to the spur on the east of the position to cover the dead ground on the eastern slope. Then, at about l1h 30, he heard Mauser fire quite close to his left and he sent another party towards the slope of the hill. Madocks ran across to the Yorkshire Regiments sangars to discover that they were already in the hands of the Boers and The Yorkshires in a bad state of disorganization, being officerless. He learned that a party of some 50 Boers had taken the position under the cover of the Boers firing on the Western slope. These were mainly "ZARPS" lead by Sgt. Maj. van Boillon. They had crawled up to the forward sangar, suddenly leapt to their feet and wounded Capt. Orr, killed the Colour Sergeant and driven out the men. The Boers began swarming up on every side joined by 3 others -Lt. Hughes, Sgt. Gourlay and Tpr. Connell. The He shouted "Fix bayonets -charge!" and rushed forward at their head, recapturing the secondary breastwork. The Boers took cover behind the front sangar and poured a murderous, point-blank fire at the advancing British. Once again, Madocks ordered a charge but was followed by only two men! Almost miraculously, he made his way back to cover and called out for the New Zealanders to come to his assistance. About 12 responded and braving a hail of bullets bounded over the crest and into the sangar. After a short pause, Madocks again gave the order to charge: he was joined by 3 others -Lt. Hughes, Sgt. Gourlay and Tpr. Connell. The latter two were shot as they leapt but the charge succeeded in breaking the Boers hold, assisted by the force which Madocks had sent to the left flank.
The Boers then bolted down the hill, pursued by the New Zealanders. Within a short space of time, the Boers had vacated all the positions held by them and a heavy fire was poured on them as they retreated. 21 Dead Boers were found at the foot of the hill but doubtless more casualties were inflicted as they retreated.
The British lost 8 killed and many wounded; without doubt the position would not have been held had it not been for the reckless bravery of Capt. Madocks (who had been attached to the New Zealand Mounted Rifles from the Royal Artillery). For this he was Mentioned in Despatches (Gazetted; "The greatest credit is due to Capt. Madocks and his New Zealanders for their prompt action".) After the action at Slingersfontein, the Boer front was extended still further to the east as far as Stormfontein, whilst similarly, French was able to extend his lines still further with the arrival of Gen. Clements with the Royal Irish and Worcestershire Regiments on 15th January. On the 18th, Clements was placed in command of the right wing and made Slingersfontein his headquarters up to 5th February. With him were two and a half Battalions of Infantry, two Squadrons of Mounted Troops and Four guns of the R.H.A .. Porter moved 8 miles further east to the vicinity of Potfontein while Rimington took up position further north with squadrons of his Guides at Kleinfontein. This marked the extreme right-hand position of the British and by making use of various ruses, created the impression that the Boers were facing a far greater force than they actually were. Various skirmishes took place subsequently at Stubbs Hill on the 5th February, and again on the 12th. On the 9th Feb., Gen. Celliers took the positions at West Australian Hill (Vergelegen Farm), Stubbs Hill and others, after they had been evacuated.